Sigfox Callbackで温度、湿度、気圧をSlackへ通知してみた
10月12日にSigfoxハンズオン広島(お土産付き)へ参加しArduino用Sigfoxシールド(Sigfox Shield for Arduino : UnaShield)を頂いたので、温度、湿度、気圧をSlackへ通知してみました。
ArduinoからSlackへの通知する構成図
本当ならAWS IoT を使用するのだろうけど今回は手っ取り早く下記の方法で。
UnaShieldで取得した温湿度・気圧センサーデータをSigfoxで送信
AWS Lambdaを使用してSlackへPOST送信し通知

- Sigfoxとは
- Arduino用Sigfoxシールドの準備
- Arduinoのプログラミング
- Sigfox Cloud側のCALLBACK設定
- Slackの設定
- AWS Lambda、Amazon API Gatewayの設定
- 最後に
- 参考URL
Sigfoxとは
フランスの通信事業会社Sigfox社が2009年から提供しているIoT向けに特化したLPWA通信規格(Low Power、Wide Area)です。国内では京セラコミュニケーションシステム株式会社(以下、KCCSと表記)が事業者としてサービスを提供しています。
Arduino用Sigfoxシールドの準備
ハンズオンでお土産で頂いたUnaShieldには温湿度・気圧センサ(BME280)が搭載されているのでこのセンサーを利用して 温度、湿度、気圧を取得します。
UnaShieldを使用する前にSigfox Backend Cloudへの登録する必要があります。登録方法は取扱説明書に記載されているのでそれに従って登録します。
Sigfox Shield for Arduino(UnaShield V2 / V2S* )取扱説明書
Arduinoのプログラミング
今回はUnaShieldに標準で搭載されている温湿度・気圧センサ(BME280)から値を取得しSigfox Cloudへ送信する為のプログラムを作成し実行します。 温湿度・気圧センサ(BME280)を利用すりプログラムに関しては下記のサンプルを元に作成します。
30分毎に温度、湿度、気圧をSigfox Cloudへ送信します。(Arduinoのソース)
#include <Wire.h>
#include <SPI.h>
#include "Adafruit_Sensor.h"
#include "Adafruit_BME280.h"

#define BME_SCK 13
#define BME_MISO 12
#define BME_MOSI 11
#define BME_CS 10

#define SEALEVELPRESSURE_HPA (1013.25)

Adafruit_BME280 bme; // I2C

#include "SIGFOX.h"

static const String device = "NOTUSED";        //  Set this to your device name if you're using SIGFOX Emulator.
static const bool useEmulator = false;         //  Set to true if using SIGFOX Emulator.
static const bool echo = true;                 //  Set to true if the SIGFOX library should display the executed commands.
static const Country country = COUNTRY_JP;     //  Set this to your country to configure the SIGFOX transmission frequencies.
static UnaShieldV2S transceiver(country, useEmulator, device, echo);  //  Assumes you are using UnaBiz UnaShield V2S Dev Kit


void setup() {
  //  Initialize console so we can see debug messages (9600 bits per second).
  Serial.begin(9600);
  Serial.println(F("Running setup..."));
  //  Initialize the onboard LED at D13 for output.
  pinMode(LED_BUILTIN, OUTPUT);
  if (!bme.begin(0x76)) stop("Bosch BME280 sensor missing");  //  Will never return.
  //  Check whether the SIGFOX module is functioning.
  if (!transceiver.begin()) stop("Unable to init SIGFOX module, may be missing");  //  Will never return.
}

void loop() {
  //  Will be called repeatedly.
  //  Read the ambient temperature, humidity, air pressure.
  float filteredTemp = bme.readTemperature();
  float filteredPressure = bme.readPressure() / 100.0F;
  float filteredAltitude = bme.readAltitude(SEALEVELPRESSURE_HPA);
  float humidity = bme.readHumidity();

  Serial.println("---");
  Serial.print("filteredTemp = ");  Serial.print(filteredTemp);  Serial.println(" degrees C");
  Serial.print("filteredPressure = ");  Serial.print(filteredPressure);  Serial.println(" hPa");
  Serial.print("filteredAltitude = ");  Serial.print(filteredAltitude);  Serial.println(" metres above sea level");
  Serial.print("humidity = ");  Serial.print(humidity);  Serial.println(" %");
  Serial.println("---");

  //  Send temperature, pressure, altitude, module temperature as a SIGFOX message.
  //  Count messages sent and failed.
  static int counter = 0, successCount = 0, failCount = 0;
  Serial.print(F("\nRunning loop #")); Serial.println(counter);

  String msg = transceiver.toHex(filteredTemp) //  4 bytes
    + transceiver.toHex(filteredPressure)      //  4 bytes
    + transceiver.toHex(humidity);             //  4 bytes

  //  Send the message.
  digitalWrite(LED_BUILTIN, HIGH);  // Turn the LED on (HIGH is the voltage level).
  if (transceiver.sendMessage(msg)) {
    Serial.println(F("successCount!"));
    successCount++;
  } else {
    Serial.println(F("failCount!"));
    failCount++;
  }
  digitalWrite(LED_BUILTIN, LOW);   // Turn the LED off (LOW is the voltage level).
  counter++;

  //  Wait a while before looping.
  //  ex:10000  milliseconds = 10 seconds.
  //     60000  milliseconds = 1  minute.
  //    900000  milliseconds = 15 minute.
  //   1800000  milliseconds = 30 minute.
  Serial.println(F("Waiting..."));
  delay(1800000);
}
Sigfox Cloud側のCALLBACK設定
Arduino用Sigfoxシールドからの送信されたデータを受信しそれをトリガーに起動されるCALLBACKを設定します。
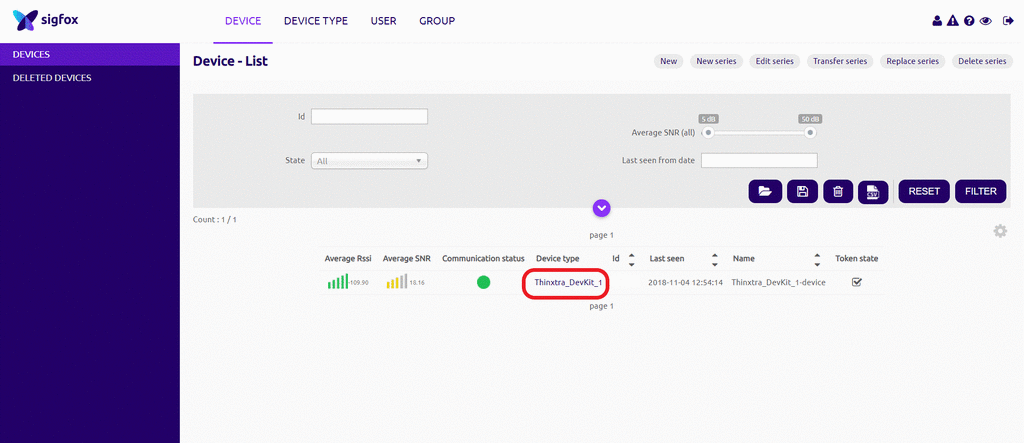
まずは、送信してくるSigfoxシールドのDEVICEの「Device Type」を選択します。
新規Collbackの作成します。

今回は単純にPOST送信するだけなので「Custom collback」を選択します。

「Custom collback」の設定
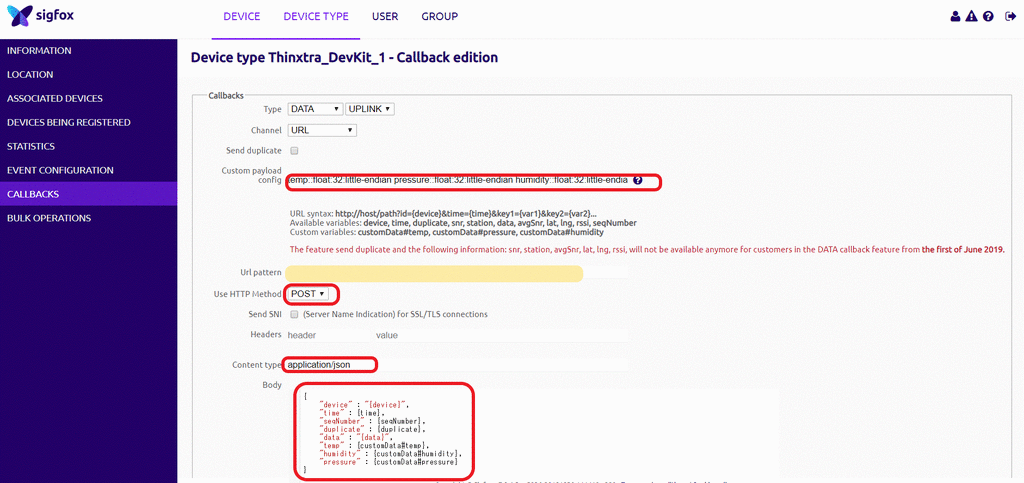
- Custom payload config:
temp::float:32:little-endian pressure::float:32:little-endian humidity::float:32:little-endian
Custom payload configの記述方法に関しては下記のサイトを参考にしました。 qiita.com
{
    "device" : "{device}",
    "time" : {time},
    "seqNumber" : {seqNumber},
    "duplicate" : {duplicate},
    "data" : "{data}",
    "temp" : {customData#temp},
    "humidity" : {customData#humidity},
    "pressure" : {customData#pressure}
}
Slackの設定
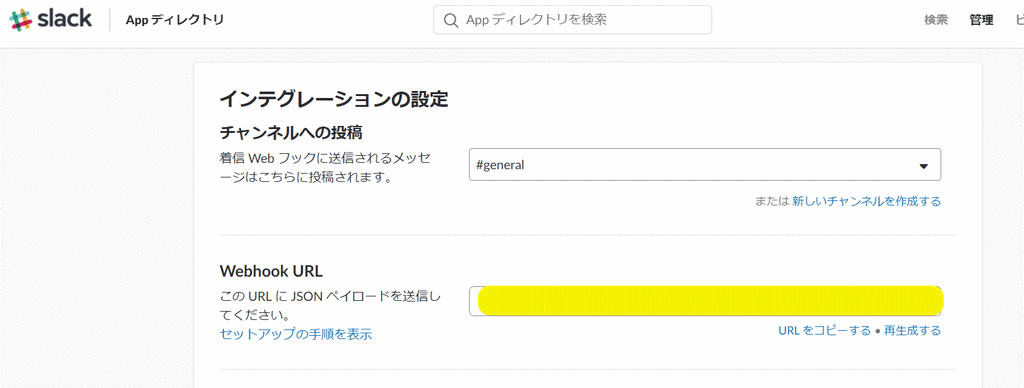
Slackへメッセージを送信するためにIncoming Webhooksを使用します。 Slackのアプリケーション追加ページより incoming-webhooks を検索・選択しインストールします。
インストールを行ったら通知を行うチャンネルを選択します。Webhook URLはAWS Lambdaから通知を行う為に使用するURLになります。
AWS Lambda、Amazon API Gatewayの設定
Amazon API Gatewayを使用しSigfox CollbackからAWS Lambdaを呼び出します。
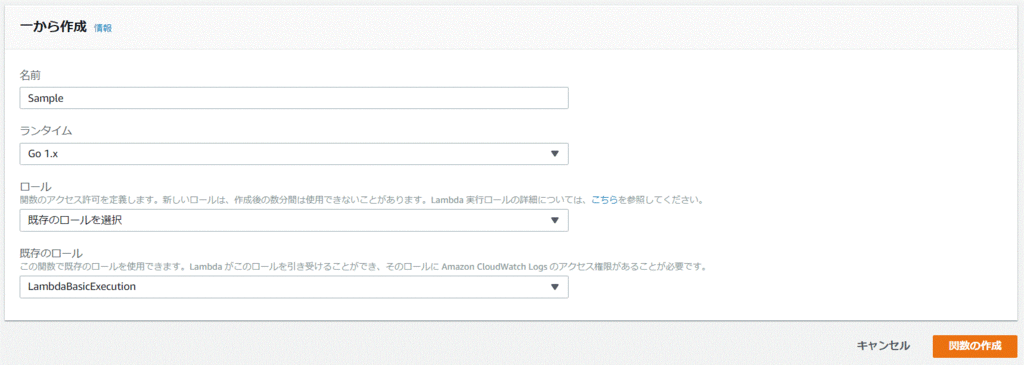
今回はAWS LambdaのランタイムはGo 1.xを使用し作成しました。
package main

import (
    "bytes"
    "encoding/json"
    "fmt"
    "github.com/aws/aws-lambda-go/lambda"
    "net/http"
    "strconv"
    "time"
)

const mySlackURL = "Slackで設定したIncoming WebhooksのWebhook URL"
const channel = "通知するSlackのチャンネル"

type SensorInfo struct {
    Device    string  `json:"device"`
    Time      int64   `json:"time"`
    SeqNumber int64   `json:"seqNumber"`
    Duplicate bool    `json:"duplicate"`
    Data      string  `json:"data"`
    Temp      float64 `json:"temp"`
    Humid     float64 `json:"humidity"`
    Press     float64 `json:"pressure"`
}

type SendSlack struct {
    Channel  string `json:"channel"`
    Username string `json:"username"`
    Text     string `json:"text"`
}

func slack(si SensorInfo) (SensorInfo, error) {
    jst := time.Unix(si.Time, 0).In(time.FixedZone("Asia/Tokyo", 9*60*60)).Format(time.RFC1123)
    message := jst +
        "\n温度:" + strconv.FormatFloat(si.Temp, 'f', 2, 64) + `℃, 湿度:` + strconv.FormatFloat(si.Humid, 'f', 2, 64) + `%` +
        "\n気圧:" + strconv.FormatFloat(si.Press, 'f', 2, 64) + `hPa`

    sendms := SendSlack{
        Channel:  channel,
        Username: "百葉箱",
        Text:     message}

    jsonBytes, err := json.Marshal(sendms)
    if err != nil {
        fmt.Println("JSON Marshal error:", err)
        return si, nil
    }
    fmt.Println(string(jsonBytes))

    req, err := http.NewRequest(
        "POST",
        mySlackURL,
        bytes.NewBuffer(jsonBytes),
    )

    if err != nil {
        fmt.Println(err)
        return si, nil
    }

    req.Header.Set("Content-Type", "application/json")

    client := &http.Client{}
    resp, err := client.Do(req)

    if err != nil {
        fmt.Println(err)
        return si, nil
    }
    fmt.Println(resp)

    defer resp.Body.Close()
    return si, nil
}

func main() {
    lambda.Start(slack)
}
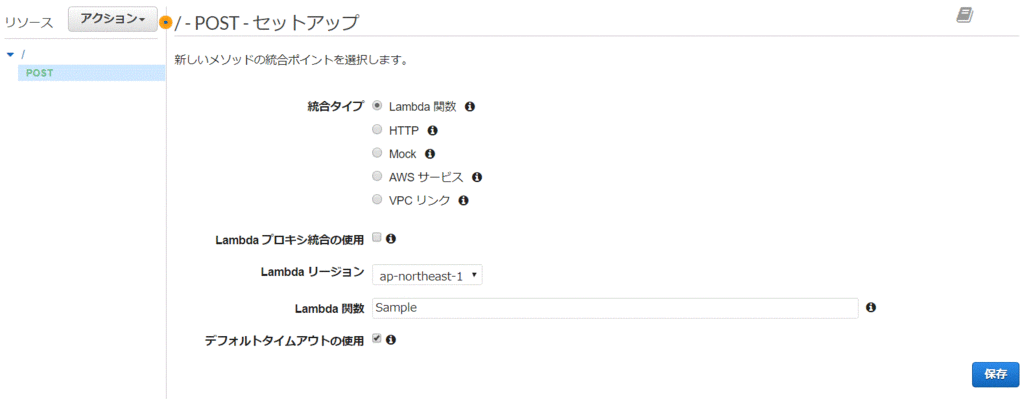
作成したAWS Lambdaを呼び出せるようにAmazon API Gatewayの作成・設定を行います。 API GatewayにPOSTメソッドを追加し先ほど作成したLambda 関数を指定します。
最後に
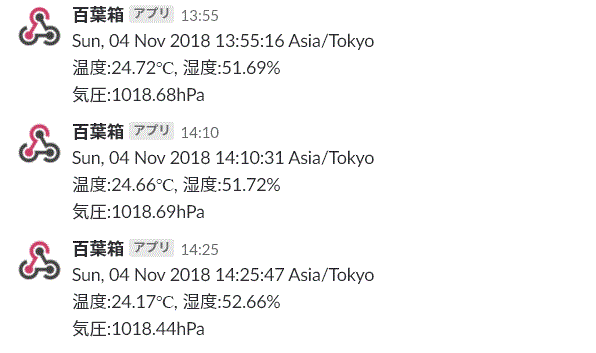
Arduinoを電源に繋ぐと30分毎にSlackに気温、湿度、気圧の通知が来るようになります。 (画像は15分毎ですが。。。)
